A Step-by-Step Guide to the Process of Completing my Cabin
A Step-by-Step Guide to the
Process of Completing my Cabin
Page 3
|
Cutting the Log Ends (Click Here for More) |
|||
 Kevin chainsaws the log ends to make the sweeps |
 And here we have "the action shot" with the log falling in mid-air ! |
 Mike grinding the log ends to make them smooth |
 Another view of the sweeps. |
|
More Chinking (Click Here for More) |
|||
 Alright, take a break and smile! |
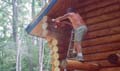
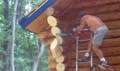
 Eddy and Mario move to level 2... on the scaffolds |
 The ladder to the top! |
 The back is done! |
|
Staining the Inside of
the Cabin (Click Here for More) |
|||
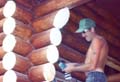
 Gary and Dan share a scaffold... does Gary look a little messy? |
 We throw Dan up on a precarious perch to stain the wall over the stairs |
 Brian and Eddy set up the scaffold inside...it looks WAY bigger inside! |
 Working our way up to the ceiling |
|
Grindering!
A Made Up Word, I know... (Click Here for More) |
|||
 Brian does some grindering! |
 A close-up view |
 Grindering a stair tread |
 Ahh. the stairs look much nicer now! |
|
Putting in the Windows
and Doors (Click Here for More) |
|||
 Mike measures the window buck |
 Terry nails the window in place... |
 The front door and window complete with Cedar Trim |
 Installing the door knobs and locks |
|
Chinking Around the Doors
and Windows (Click Here for More) |
|||
 We got a little creative here. |
 But we all like the way it looked! |
 We still need to stain the cedar, so it will blend in better. |
 Mario and Eddy, my chinking crew... |
|
The Trapezoid Windows (Click Here for More) |
|||
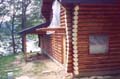
 The windows are in! |
 Looks much nicer during the day. |
 Looking out at my lake |
 The outside view |
|
A Lesson in Log Cabin
Drywalling (Click Here for More) |
|||
| The problem with drywalling around logs is that they are round, while drywall is square. Seems like a pretty simplistic statement, but it really makes drywalling kind of difficult. The challenge is that you need to transfer the contour of the logs onto your drywall. There are fancier tools you can buy to do this, but I'm using a simple $2 compass, like the ones we used to use in school, and a jigsaw. And NO, we did not drywall over ANY logs, it is just for a few interior walls. | |||
 You start by tacking the piece in place, leaving the piece longer than what you actually need, cause you will be trimming it smaller |
 Then, you take your compass, and trace the contours of the logs onto the drywall. You don't have to be perfect, cause it will never fit on the first try anyway. |
 Then, you use your jigsaw to cut along the lines you just drew. Then, you put your drywall in place, make any adjustments and screw it in place |
 It never fits on the first try, so you have to keep fine tuning your cuts with the jigsaw til it fits. |
 |
|||